By James Hyder with Nicola Gertler
State of Origin (SoO) games have their origin in Australian Rules Football, which has featured matches between Victoria and Western Australia since 1977. Australia Rugby League caught on in 1980 and has become the most commonly referred to SoO, as it continues to thrive in modern day Australian sport, with a yearly best of three series between New South Wales (NSW) and Queensland. The Australian Quidditch Association’s State of Origin series features the two longest-playing and most-developed states of Victoria and NSW in three rounds of three games throughout 2016. ‘QuidCamp,’ held in Berry, NSW, hosted the first series on Feb. 6 and 7.
The following play highlights one of the numerous rebound plays set up by the Victorian beaters, beginning with NSW beater Oscar Cozens threatening to regain bludger control. He completed a quick tap beat on the point defender and threw at Dean Rodhouse, the front beater for Victoria. Rodhouse went for the risky play of throwing his bludger at Cozens instead of potentially flicking his bludger back to his hoops to keep control and attempt a catch. It paid off big time, as Rodhouse made the catch, and the bludger he threw rebounded off Cozens’ leg toward the Victorian hoops. Rodhouse continued to beat NSW’s second beater, Desany Phanoraj, before applying pressure on NSW keeper Rob Wells. Wells tried to hit a desperate pass to Andrew Culf behind the hoops, only for it to be intercepted by Victorian keeper Callum Mayling, who promptly responded to the chorus of “no beaters” by easily lobbing a pass over to David Blamey on an open hoop.
With the Victorian ball carriers constantly wanting to hit passes and not change their offensive style from the first game, the NSW defenders easily read passes and made intercepts and easy beats. The biggest weakness of NSW’s defence was its susceptibility to mid-range shots and the beaters being nullified, allowing the Victorian ball carrier to drive through. However, Victoria’s inability to capitalise on the full man defence played by NSW demonstrates an unwillingness to take shots on an unguarded hoop. Continuing to attempt a passing game allowed NSW to recover the ball after the first or second pass in the offence, as the chasers swarmed toward the quaffle and intercepted passes. This heavy man and swarming effect further allowed beaters to make comfortable beats against the Victorian offence, which was unable to gain space or time. If Victoria had taken out the NSW beaters, this would have allowed its chasers to play a bludgerless game, allowing for a more evenly-matched offence with only quaffle players opposing quaffle players. Victoria’s other option to improve its offensive chances would have been to shoot rather than pass. As demonstrated in the clip below, rather than passing to Thomas (VIC) who was beat as well as manned by Elle Crumpton (NSW), Nathan Morton should have made an attempt to shoot at the unguarded hoops with Ned Smith positioned behind to retrieve or catch a missed shot for a second attempt.
Despite this, Rodhouse did enough in another of Victoria’s plays to distract Derrick and take his attention off the quaffle play. With Victoria moving up on offence and bludger control resting in the hands of the NSW beaters, Rodhouse made a beat on Ying Lee. Her inability to predict the throw and flick her bludger backward forced Derrick to make the decision to beat Rodhouse and maintain bludger control instead of focusing on quaffle play. Mayling took utmost advantage of the beater chaos to drive through and score.
Not every aggressive beater play was capitalised on by NSW, and the team missed numerous good opportunities to score, as seen in the following back-to-back offences.
From the field map, we can see that the shots on goal that Victoria took were from its ball carriers, namely Mayling, who sunk four goals on four shots in the space of five minutes to blow the game apart. Victoria still had the quintessential passing game, but it was used sparingly in comparison to previous games. The plan was simple: have the beaters remove the opposing point defender so Mayling could push into the keeper zone and shoot. The following play shows just how simple it was.

State of Origin (SoO) games have their origin in Australian Rules Football, which has featured matches between Victoria and Western Australia since 1977. Australia Rugby League caught on in 1980 and has become the most commonly referred to SoO, as it continues to thrive in modern day Australian sport, with a yearly best of three series between New South Wales (NSW) and Queensland. The Australian Quidditch Association’s State of Origin series features the two longest-playing and most-developed states of Victoria and NSW in three rounds of three games throughout 2016. ‘QuidCamp,’ held in Berry, NSW, hosted the first series on Feb. 6 and 7.
Game 1
The Victorian Leadbeaters took the first game 130*-40 against the NSW Blue Tongue Wizards with a dominant display, jumping out to a game deciding 50-point lead.
Game 1
|
Against two bludgers
|
Against one bludger
|
Against no bludger
|
Offensive pass & catch
|
Shots
|
Drives
|
Bludger control
|
Victoria
|
2/8 (1/1)
|
3/7 (0/1)
|
3/3 (0/0)
|
13/19 - 68.4%
|
8/11
|
2/2
|
61.9%
|
NSW
|
2/13 (0/2)
|
1/5 (0/0)
|
0/1 (0/1)
|
9/19 - 47.4%
|
1/4
|
3/7
|
38.1%
|
Statistics of Game 1, with snitch on pitch statistics in parentheses.
By breaking down the statistics we can achieve a better understanding of Victoria’s comfortable win over NSW. Bludger control was a key difference between the two sides. On paper, NSW appeared to have stronger beaters, with the likes of Luke Derrick, Nicholas Allan, and Hannah Monty, suggesting that the easiest key to victory would be to dominate the beater game. What actually happened turned out to be the opposite, with Victoria constantly outplaying and out-controlling NSW, despite the shoulder injury to Matt Ingram (VIC) a week out from the game that reduced the squad to having only two male beaters. The 61.9 percent bludger control from Victoria was game-defining and meant NSW started the game having to face four consecutive two-bludger defences, with no success.
By breaking down the statistics we can achieve a better understanding of Victoria’s comfortable win over NSW. Bludger control was a key difference between the two sides. On paper, NSW appeared to have stronger beaters, with the likes of Luke Derrick, Nicholas Allan, and Hannah Monty, suggesting that the easiest key to victory would be to dominate the beater game. What actually happened turned out to be the opposite, with Victoria constantly outplaying and out-controlling NSW, despite the shoulder injury to Matt Ingram (VIC) a week out from the game that reduced the squad to having only two male beaters. The 61.9 percent bludger control from Victoria was game-defining and meant NSW started the game having to face four consecutive two-bludger defences, with no success.
The following play highlights one of the numerous rebound plays set up by the Victorian beaters, beginning with NSW beater Oscar Cozens threatening to regain bludger control. He completed a quick tap beat on the point defender and threw at Dean Rodhouse, the front beater for Victoria. Rodhouse went for the risky play of throwing his bludger at Cozens instead of potentially flicking his bludger back to his hoops to keep control and attempt a catch. It paid off big time, as Rodhouse made the catch, and the bludger he threw rebounded off Cozens’ leg toward the Victorian hoops. Rodhouse continued to beat NSW’s second beater, Desany Phanoraj, before applying pressure on NSW keeper Rob Wells. Wells tried to hit a desperate pass to Andrew Culf behind the hoops, only for it to be intercepted by Victorian keeper Callum Mayling, who promptly responded to the chorus of “no beaters” by easily lobbing a pass over to David Blamey on an open hoop.
In comparison, two minutes later NSW made a similar play with Allan throwing at the front beater for Victoria, Deni Tasman, who threw his bludger at Allan in return. This time Wells was able to hit the pass to Culf behind the hoops, who sunk the shot.
So why did this play work the second time round? It comes down to the passing efficiency from NSW and the decision-making from the defensive Victorian beaters. Unlike Rodhouse in the previous play, Tasman made no attempt to catch and instead took the beat, being lucky to hold onto bludger control as Allan’s bludger ricocheted beyond the Victorian defensive hoop line. With one beater down Wells could draw the remaining beater, Kristeen Wong, toward him and hit the pass to Culf. The other notable difference was that NSW were able to scramble a bludger back to their half through Shu Ying Lee to prevent the easy rebound goal.
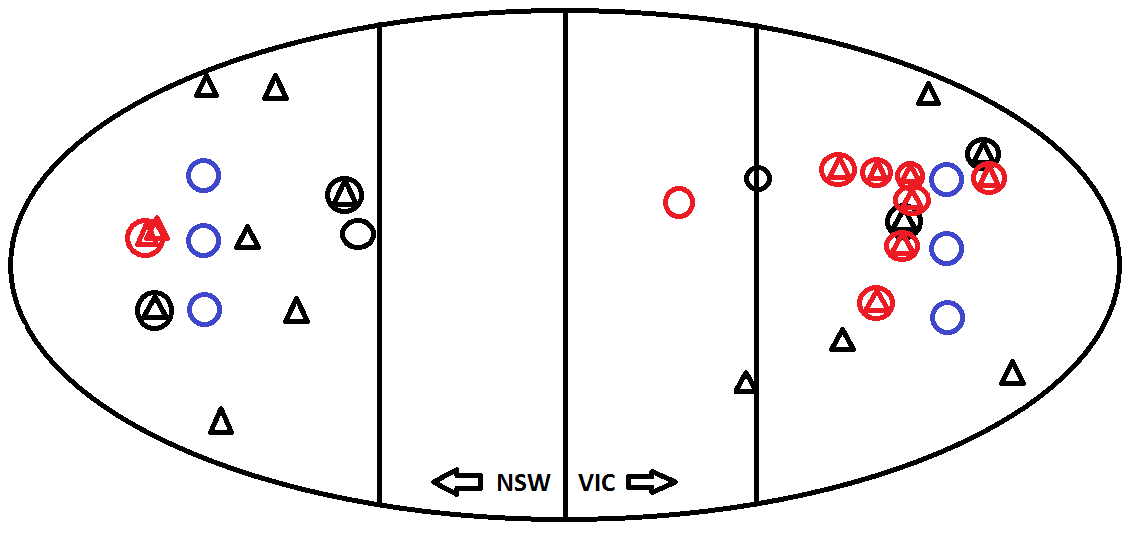
NSW threw at 47 percent for offensive passes and allowed the Victorian keepers to make four intercepts (Mayling - 3, Mark Dorman - 1) throughout the game. NSW only created two real opportunities to score off passes, with Culf receiving both passes and converting one of the two.
NSW threw at 47 percent for offensive passes and allowed the Victorian keepers to make four intercepts (Mayling - 3, Mark Dorman - 1) throughout the game. NSW only created two real opportunities to score off passes, with Culf receiving both passes and converting one of the two.
Field map of offensive passing plays (triangle = catch, circle = shot, red = goal)
The NSW lineup, with players like Nicholas Albornoz and Dameon Osborn, assumed it was never going to need a heavy passing and catching game around the hoops; these players instead favoured a method of creating and forcing through bludgerless defence scenarios, using brute strength to drive the ball through the hoop. Unfortunately, NSW’s beaters rarely created those scenarios, resulting in NSW going 3/7 when attempting to drive.
One circumstance where the NSW beaters created a bludgerless scenario was with Derrick’s injection into the game. When Victoria received two yellow cards to chasers Caitlin Thomas and Michael Braham, Derrick was easily able to pressure, absorb, and catch a throw from Tasman, allowing Albornoz, a University of Sydney teammate, to drive through and score back-to-back goals.
One circumstance where the NSW beaters created a bludgerless scenario was with Derrick’s injection into the game. When Victoria received two yellow cards to chasers Caitlin Thomas and Michael Braham, Derrick was easily able to pressure, absorb, and catch a throw from Tasman, allowing Albornoz, a University of Sydney teammate, to drive through and score back-to-back goals.
The Victorian defence was otherwise clinical, with Captain Mayling leading the charge by winning two 1 vs. 1 scenarios against Wells and James Mortensen that otherwise would have resulted in NSW goals. One of Victoria’s key strategies in dealing with the physically larger chasers of Osborn and Albornoz was to lock up and cling onto the quaffle in an attempt to strip NSW of the ball or stall until a beater could support.
The Victorian offence was fluid, and its ball carriers had a 68 percent passing efficiency. As can be seen from the field map above and in the following clip, chasers were able to constantly get free around the hoops and score easy goals.
The Victorian offence was fluid, and its ball carriers had a 68 percent passing efficiency. As can be seen from the field map above and in the following clip, chasers were able to constantly get free around the hoops and score easy goals.
Final Results:
Victoria Leadbeaters - 130*
Goals: 3 Mayling, 1 Blamey, Dorman, Growse, Menkhorst, Morton, Williams
Cards: Thomas (Y), Dorman (Y), Mayling (Y)
Snitch Catch: Kemister
New South Wales Blue-Tongue Wizards - 40
New South Wales Blue-Tongue Wizards - 40
Goals: 2 Wells, 1 Albornoz, Culf
Cards: Atkins (Y)
Game 2:
Game 2:
The NSW Blue Tongue Wizards secured a must win in the second game 100*-60, in a back-and-forth match that came down to an Osborne snitch catch.
Game 2
|
Against two bludgers
|
Against one bludger
|
Against no bludger
|
Offensive pass & catch
|
Shots
|
Drives
|
Bludger control
|
Victoria
|
2/10 (0/1)
|
3/7 (0/1)
|
0/2 (1/1)
|
2/12 - 16.7%
|
4/5
|
2/5
|
50.0%
|
NSW
|
1/10 (1/1)
|
3/7 (0/0)
|
1/2 (1/2)
|
3/12 - 25.0%
|
4/5
|
3/7
|
50.0%
|
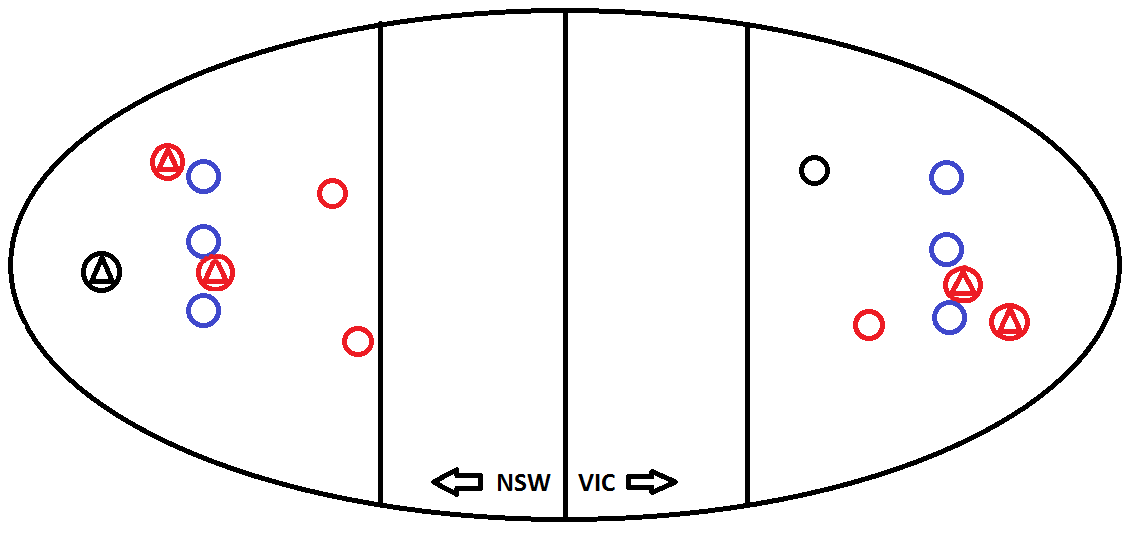
From the initial statistical outlook, this game was dead even, with both sides scoring goals at similar percentage rates and bludger control split at 50 percent. Notably, there was a huge drop in offensive passing percentages for both teams. Victoria dropped from 68.4 percent to 16.7 percent, while NSW dropped from 47.4 percent to 25 percent, which may be attributed to the dewy ground conditions. Both sides made 12 passes into the opposition’s keeper zone, seven less than the previous game, which is evidence of teams switching to a slower game. NSW employed a different defensive structure compared to the first game, significantly reducing Victoria’s passing efficiency.
Field map of offensive passing plays (triangle = catch, circle = shot, red = goal)
With the Victorian ball carriers constantly wanting to hit passes and not change their offensive style from the first game, the NSW defenders easily read passes and made intercepts and easy beats. The biggest weakness of NSW’s defence was its susceptibility to mid-range shots and the beaters being nullified, allowing the Victorian ball carrier to drive through. However, Victoria’s inability to capitalise on the full man defence played by NSW demonstrates an unwillingness to take shots on an unguarded hoop. Continuing to attempt a passing game allowed NSW to recover the ball after the first or second pass in the offence, as the chasers swarmed toward the quaffle and intercepted passes. This heavy man and swarming effect further allowed beaters to make comfortable beats against the Victorian offence, which was unable to gain space or time. If Victoria had taken out the NSW beaters, this would have allowed its chasers to play a bludgerless game, allowing for a more evenly-matched offence with only quaffle players opposing quaffle players. Victoria’s other option to improve its offensive chances would have been to shoot rather than pass. As demonstrated in the clip below, rather than passing to Thomas (VIC) who was beat as well as manned by Elle Crumpton (NSW), Nathan Morton should have made an attempt to shoot at the unguarded hoops with Ned Smith positioned behind to retrieve or catch a missed shot for a second attempt.
One of the well-known weaknesses of the Victorian beaters is their lack of 1.5 plays. In the play above, even with the man-on by Crumpton, if the Victorian beaters had made a 1.5 play, they could have given Thomas a greater opportunity to gather the quaffle and continue the play. Statistically, the lack of 1.5 or similar beater plays shows, as Victoria only scored on 3/7 plays against one-bludger defence. The lack of physical pressure by the Victorian beaters may be attributed to a lack of substitutes; however, it gave NSW the opportunity to read the quaffle game and make key beats to cause turnovers without being pressured for its single bludger.
In the following clip, the Victorian beaters made the standard play of targeting one NSW beater to regain bludger control. In this particular play, Carolyn Themel was the target, giving up bludger control when she just took the beat instead of flicking her bludger back to her hoops. It is the next part that is interesting; after executing the bludger control play perfectly, both Victorian beaters simply ran back to their hoops with no thought of helping their chaser teammates. If Rodhouse had either beat the point defender or made a 1.5 play at Derrick with no bludger partner to block for him, Mayling could have driven through the defence or hit a pass to Cassia Menkhorst with a height mismatch against Laura Atkins. Instead, Derrick just beat the pass when it was made.
In the following clip, the Victorian beaters made the standard play of targeting one NSW beater to regain bludger control. In this particular play, Carolyn Themel was the target, giving up bludger control when she just took the beat instead of flicking her bludger back to her hoops. It is the next part that is interesting; after executing the bludger control play perfectly, both Victorian beaters simply ran back to their hoops with no thought of helping their chaser teammates. If Rodhouse had either beat the point defender or made a 1.5 play at Derrick with no bludger partner to block for him, Mayling could have driven through the defence or hit a pass to Cassia Menkhorst with a height mismatch against Laura Atkins. Instead, Derrick just beat the pass when it was made.
Despite this, Rodhouse did enough in another of Victoria’s plays to distract Derrick and take his attention off the quaffle play. With Victoria moving up on offence and bludger control resting in the hands of the NSW beaters, Rodhouse made a beat on Ying Lee. Her inability to predict the throw and flick her bludger backward forced Derrick to make the decision to beat Rodhouse and maintain bludger control instead of focusing on quaffle play. Mayling took utmost advantage of the beater chaos to drive through and score.
One big difference between the sides is that NSW is well-versed in 1.5 strategies, despite not always completing them to great success. With Victoria down a player due to Braham’s yellow card, NSW beater Allan pressured Rodhouse and forced the beat upon him, the deflection of which allowed Wells to drive through the defence before soaking a throw from a scrambling Rodhouse and passing to Holly Cairncross unmarked on the right hoop. Despite a successful goal, the slow response from Wells in the no-bludger situation showed a lack of cohesion that almost came back to bite NSW, as Rodhouse was only a second too late with the beat on Wells.
Not every aggressive beater play was capitalised on by NSW, and the team missed numerous good opportunities to score, as seen in the following back-to-back offences.
This long, drawn out play saw Allan threaten Victoria’s back beater Rachel Davis, who promptly beat him while Tasman at the front traded beats with Phanoraj, who was left with no support after Allan was beat. Logan Davis, the ball carrier for NSW, decided to drive through the Victorian defence before blindsiding himself to a follow-up beat from his Victorian namesake. If Phanoraj had thrown her bludger at Tasman at the same time that Allan was getting beat, then Logan Davis would have been able to drive through on a no bludger defence. Instead, the NSW beaters went one by one and allowed Rachel Davis to get back into the play after her initial beat.
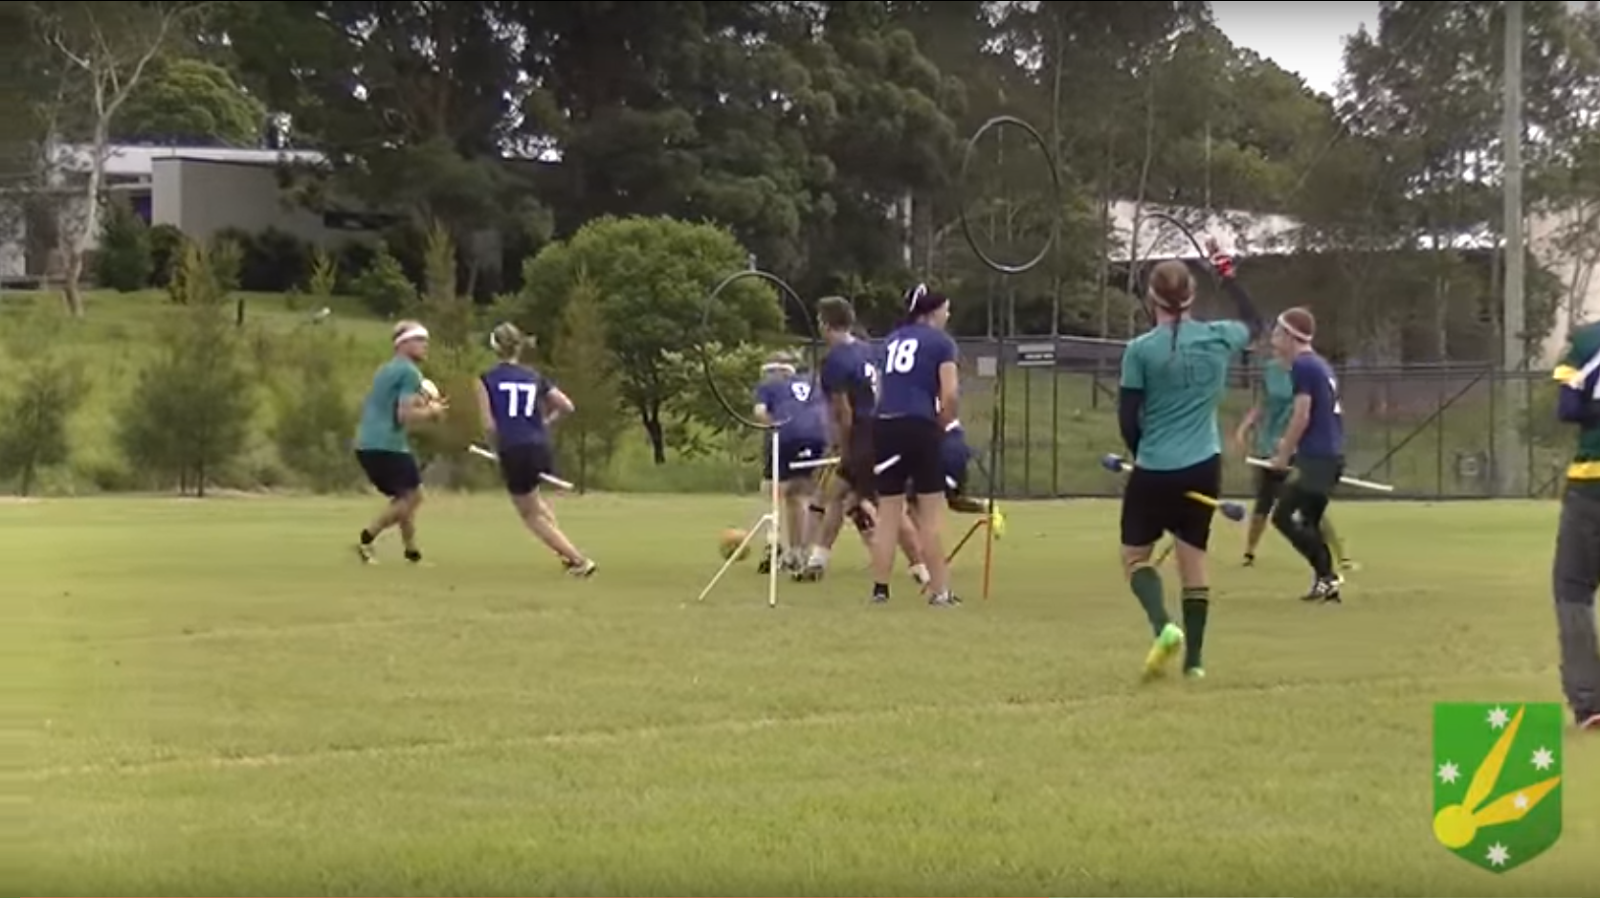
Luckily for NSW, the quaffle rebounded back into its chasers’ hands, and they were able to attempt this offence again. NSW also got gifted bludger control when Rachel Davis pushed unnecessarily high to make a beat, and its beaters found themselves with the perfect opportunity to 1.5. Instead, Allan caught Tasman off guard with a throw, and Phanoraj followed up with the beat on Rachel Davis to guarantee no bludgers for her chaser teammates. Logan Davis once again attempted to drive through before passing off to Culf, who was mismatched against Menkhorst. The below photo shows the options that Culf had: drive to the hoops against no bludgers, look up and pass off to Osborn, who should be cutting into that left hoop, or shoot. Ultimately he chose the last and worst option, which did not work, as Mayling was primed to cover that middle hoop shot. Not surprisingly, as seen in the clip, Culf missed the shot and turned the quaffle over.
Luckily for NSW, the quaffle rebounded back into its chasers’ hands, and they were able to attempt this offence again. NSW also got gifted bludger control when Rachel Davis pushed unnecessarily high to make a beat, and its beaters found themselves with the perfect opportunity to 1.5. Instead, Allan caught Tasman off guard with a throw, and Phanoraj followed up with the beat on Rachel Davis to guarantee no bludgers for her chaser teammates. Logan Davis once again attempted to drive through before passing off to Culf, who was mismatched against Menkhorst. The below photo shows the options that Culf had: drive to the hoops against no bludgers, look up and pass off to Osborn, who should be cutting into that left hoop, or shoot. Ultimately he chose the last and worst option, which did not work, as Mayling was primed to cover that middle hoop shot. Not surprisingly, as seen in the clip, Culf missed the shot and turned the quaffle over.
Andrew Culf sizes up his options | Photo credit: Australian Quidditch Association (via YouTube)
Final Results:
New South Wales Blue-Tongue Wizards - 100*
Goals: 2 Albornoz, Culf, 1 Cairncross, Diep, Mortensen
Cards: Monty (Y), Atkins (Y)
Snitch Catch: Osborn
Victoria Leadbeaters - 60
Victoria Leadbeaters - 60
Goals: 3 Mayling, Thomas, Menkhorst, Blamey
Cards: Braham (Y)
Game 3:
Game 3:
In the final match of the three match series, the Victorian Leadbeaters made up for their loss in the previous game by dominating from start to finish with an emphatic 160*-10 win over NSW, securing the first ever SoO trophy.
Game 3
|
Against two bludgers
|
Against one bludger
|
Against no bludger
|
Offensive pass & catch
|
Shots
|
Drives
|
Bludger control
|
Victoria
|
3/7 (0/1)
|
2/7 (4/5)
|
1/1 (2/3)
|
7/16 - 43.8%
|
9/12
|
2/2
|
67.3%
|
NSW
|
0/12 (0/5)
|
0/6 (0/2)
|
0/0 (1/1)
|
7/15 - 46.7%
|
0/7
|
1/8
|
32.7%
|
In the analysis of game two, a lot of emphasis was put on the NSW defence and how effective it was in nulling the Victorian passing game. The final score stands for itself in the fact that it clearly did not work in game three, so what happened differently this game?
From the statistics, both teams’ passing efficiency increased by over 20 percent and Victoria had the majority of bludger control with 67.3 percent. The other major difference was the increase in shots taken by Victoria (9/12), although the numbers were similar to that of game one (8/11). The real difference in this final game lies in the manner and location of shots.
From the statistics, both teams’ passing efficiency increased by over 20 percent and Victoria had the majority of bludger control with 67.3 percent. The other major difference was the increase in shots taken by Victoria (9/12), although the numbers were similar to that of game one (8/11). The real difference in this final game lies in the manner and location of shots.
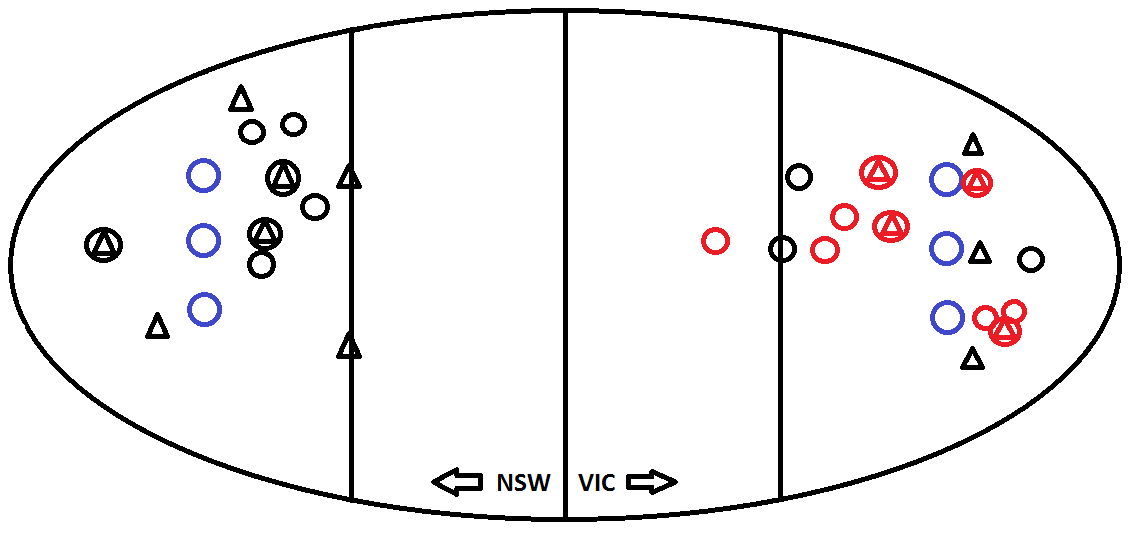
Field map of offensive passing plays (triangle = catch, circle = shot, red = goal), drives not included
From the field map, we can see that the shots on goal that Victoria took were from its ball carriers, namely Mayling, who sunk four goals on four shots in the space of five minutes to blow the game apart. Victoria still had the quintessential passing game, but it was used sparingly in comparison to previous games. The plan was simple: have the beaters remove the opposing point defender so Mayling could push into the keeper zone and shoot. The following play shows just how simple it was.
Opting for a 1.5 play, Rodhouse easily targeted the lone defensive beater for NSW in Phanoraj and forced her to beat him. This came about from Allan’s terrible decision to chase after the bludger Rodhouse threw back to his hoops instead of protecting Phanoraj from the 1.5. Mayling easily sidestepped Mortensen at point before commando rolling himself into shooting range, with Liam McCoppin’s screen on Albornoz guaranteeing the shot and goal.
The previous clip showed how Victoria comfortably scored against a one-bludger defence through the use of a 1.5 play, a rarity for this team, but it was also able to employ the same shooting strategy against a two-bludger defence.
The previous clip showed how Victoria comfortably scored against a one-bludger defence through the use of a 1.5 play, a rarity for this team, but it was also able to employ the same shooting strategy against a two-bludger defence.
Sitting back with bludger control on defence, the NSW beaters did not assist their point chaser, which allowed Tasman to make an easy beat on point defender Osborn. Tasman pushed up to make a beat on Derrick to regain bludger control, giving Mayling plenty of free space to simply waltz up and slot in another shot. NSW’s beater, Themel, got lost in the play, as she neither pushed up to pressure Mayling’s shot, nor did she defend her beater partner as Victoria stole bludger control.
The NSW offence was lacklustre in game three, producing its worst driving performance and worst shooting efficiency of the series. NSW’s passing was more efficient than game two, but it still failed to capitalise on catches made around the hoops.
The NSW offence was lacklustre in game three, producing its worst driving performance and worst shooting efficiency of the series. NSW’s passing was more efficient than game two, but it still failed to capitalise on catches made around the hoops.
With Victorian beater Rodhouse in the penalty box and NSW holding bludger control, this was the ideal scenario to open its scoring account. The NSW ball carriers correctly waited for their substituting beaters to enact a 1.5 play. Wong (VIC) was forced to beat both Derrick and Ying Lee in succession as Osborn attempted to drive through with the brief window of no bludgers created by his teammates.
Dameon Osborn attracts most of the Victorian defence towards him| Photo credit: Australian Quidditch Association (via YouTube)
Osborn, commonly regarded as a massive driving threat in Australian quidditch, drew all three chasers and the keeper toward him. What we do not see in the screenshot is that Minh Diep (NSW) is sitting on the far left hoop with no defender manned against him. Instead of making an easy pass to Diep, Osborn tried to dunk on the falling hoop but was blocked as Wong returned in time to knock him out of play. Osborn just had to make that pass. However, he turned to his non-natural left side in the tackle from Blamey (VIC), preventing him from getting an easy pass off earlier. Despite this, he still managed to get the arm up but still wrongly chose the dunk over the easy pass.
NSW remained in control of the quaffle, and 30 seconds later, there was another scoring opportunity. Derrick removed Wong and her bludger from the defence by forcing a throw from her; this was a poor decision, as it once again allowed Osborn to drive to the hoops. This time, there appeared to be a consideration whether to pass to Diep or Logan Davis, both in prime positions on either side of the left hoop. However, the moment of indecision cost NSW, as Mayling broke the screen from Atkins (NSW) and was able to lock onto Osborne’s right arm and again prevent the pass.
This example occurred at the eighth minute mark of real time, and could have allowed NSW to set the early pace, as Victoria did not score until the 16th minute. However, NSW’s inability to make the most of scoring opportunities meant that it gradually fell behind in the tempo of the game.
Hannah Monty single-handedly nulled Victoria’s offensive pushes in the first 10 minutes of the game. In the space of two minutes, she won two 1 vs. 1’s against the Victorian beaters and created two forced errors from Mayling through her pressure, as his passes were intercepted by Wells.
The final clip featuring Monty’s defence shows Victoria’s ball carriers adapting to her pressure by passing the ball around and almost scoring a great team goal. Oscar Cozens managed to read the play and prevent the certain goal with a clutch beat on Blamey.
The NSW beaters did everything right on this offence by targeting Natasha Keehan to regain bludger control. However, despite Tasman missing his throw on Mortensen, the NSW chasers were still unable to score.
Themel locked onto Rachel Davis’ right arm and forced the bludger loose to gain control for NSW. Meanwhile, in the quaffle game, Albornoz was so focused on losing the point defender that he ran straight into Tasman, the remaining beater for Victoria. If the beaters had been able to communicate to Albornoz and tell him to relax, Derrick would have had an easy beat on the point defender with a following 1.5 play that likely would have removed Tasman from the play and allowed Albornoz to drive through the defence.
Another great offensive play by the NSW beaters to regain bludger control was to isolate Victorian beater Rachel Davis, who had pushed up too far. Allan did the right thing by targeting Tasman; removing him from the play would allow Osborn to drive through. However, he chose to throw rather than guarantee with a 1.5 play. Tasman outplayed Allan with a block and follow up beat on Osborn to prevent the goal, simultaneously gaining Allan’s bludger and overall control. In making a 1.5 play, Allan would have been more successful in pressuring Tasman and forced a throw to prevent a tackle. Osborn could have still driven through, and NSW could have kept bludger control.
The bludger statistics show a big disparity in bludger control, but in actuality NSW played well with its beaters on defence and could have played a smarter offence to give its chasers more of an advantage. Regardless, the communication between positions was lacking and led to numerous mistakes.
Final Results:
Final Results:
Victoria Leadbeaters - 160*
Goals: 6 Mayling, 4 Growse, Morton, Thomas
Cards: Rodhouse (Y), Williams (Y), Dorman (Y)
Snitch Catch: Kemister
New South Wales Blue-Tongue Wizards - 10
New South Wales Blue-Tongue Wizards - 10
Goals: 1 Albornoz
Cards: Derrick (B), Mortensen (Y), Logan Davis (Y)
No comments:
Post a Comment